Are you:


Please call us 800-200-3737 or send an .

Blog: Be in the Know

The Crocheted Moon, Riverton, UT

Be in the Know...Fun Facts & Free Easter Bunny Pattern

posted April 4, 2022   category » Be in the Know
Be in the Know...Fun Facts & Free Easter Bunny Pattern


Unusual & Quirky Crochet Facts

  1. In the late 1800s, men's and women's hairstyles required the use of oily pomade. Consequently, crochet became more popular as people put little sewn pieces on top of expensive furniture to protect them from the pomaded heads.

  2. Crochet became increasingly popular in the 1920s when women stopped wearing corsets and began to crochet lacy underwear.

  3. Artist Nathan Vincent crocheted and knitted an entire locker room. He has also knitted taxidermy busts, urinals, guns, and tools. His goal is to represent masculine objects in a new and softer medium.

  4. Over 2,000 women from 14 countries met in India to create the world's largest crocheted blanket. The mega-blanket measured approximately 120,000 square feet, or about the size of one-and-a-half football fields.

  5. While crochet has proven health benefits, injuries do occur. Health professionals even have a medical code to note when a crochet injury has occurred: CODE Y93D1...(I didn't know I was in such a dangerous profession! ;) )


And now for some Easter Fun!

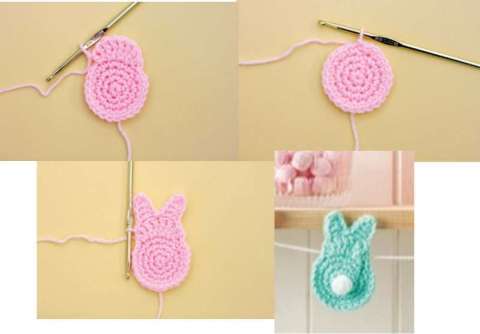
I came across and adorable little Easter pattern I wanted to share with you. If you are just starting to decorate or you just need a little something extra to add to your decorations, try this cute bunny pattern. You can turn them into ornaments to hang from a tree, make a garland, or stack them up in a an Easter Basket. Either way, it's a quick and fun way to add whimsy to your holiday:


Simple Easter Bunny Pattern


You will need

  • 100% acrylic, 100g/276m per skein. You can find the skeins at Hobby Lobby (my favorite place), Michaels, or Walmart. 
  • Colors (or 4 of your choosing)
  • Light Pink
  • White
  • Light Green
  • Light Yellow
  • 5mm (UK 6, US H/8) crochet hook. You can also find hooks at Hobby Lobby, Michaels, Walmart, or online at Amazon.
  • Large Sewing Needle for stringing the bunnies
  • Small pom pom for the tail
  • Hot glue gun to glue on the tail


Abbreviations

Single Crochet = SC

Half Double Crochet = HDC

Double Crochet = DC

Chain = ch

Slip Stitch = sl st


Finished Size

Approx. 8cm or 3”


BODY

R1: choose the color of yarn and make a magic ring, ch1, SC 6 into the ring and close the ring tightly by pulling the loose end, sl st to 1st SC to join, ch 1                                                                                                                                                           (6)

R2: 2SC in each st around, sl st to the 1st SC to join, ch 1                           (12)

R3: *SC in next st, 2SC in next st* repeat from ** to end of round, sl st to the 1st SC to join, ch 1                                                                                                                                  (18)

R4: *SC in each of the next 2 sts, 2SC in next st* repeat from ** to end of round, sl st to the 1st SC to join, ch 1 & do not fasten off                                     (24)


HEAD

R5: (HDC, DC) in the next st, 2DC in each of the next 2 sts, (DC, HDC) in the next st, sl st in the remaining sts to the other side of the head, do not fasten off                       (8)


EARS

R6: sl st  into the 1st HDC and the 1st DC from Round 5, *ch5, HDC in 2nd ch from hook, DC in each of the next 3 chs, sl st in the 4th st of Round 5.  Repeat the stitches between the ** for the second ear, sl st in the 2nd to last st of Round 5, FO your yarn.


FINISHING

Using your needle weave in any loose yarn tails and trim the excess.  For the tail glue a white pom pom in the center of the body. 

If you would like to make a garland, choose a yarn color, and measure out the length you need.  Then, thread the yarn on our needle and string the yarn through the bunny’s section where the head and the body meet.  Or you can attach a single yarn loop on the backside of the bunny between the ears.


If you are not familiar with how to

make the crochet stitches used in

this pattern you can go to You Tube

and type in the type of stitch you

are wanting to learn.  They have

some good instructional videos that

are easy to follow.


comments

Be the first to add a comment!

add comment

Be In the Know...Hand Crocheted Christmas Ornaments

posted December 10, 2021   category » Be in the Know
Be In the Know...Hand Crocheted Christmas Ornaments
 
Old World Traditions
I love living in the United States for many reasons, but during the holidays it usually has to do with all the traditions we've adopted. You don't have to travel the world to find different cultural experiences, you can probably walk next door to your neighbors where they each have their own way of celebrating that has been passed down through their family line.
The love of hand crafted items is one that has been prevalent in my family for generations. We are full of crafters, sewers, crocheters, and cross stitchers. Infact, right now in my dining room is a colorful tree full of hand crafted ornaments made by family members. It started long before I could safely hold a glue gun and every Christmas we made an ornament to add to our collection. I have continued the tradition with my children, which is what go me thinking on the meaning and history of these well known Christmas decorations.
 
 
From Germany to the U.S.A
With mystic and beautiful places like the forests of Germany it is not hard to see why the art of decorating a Christmas Tree originated here. Also originating here in 1605 a.d., is the idea of bringing these pine beauties inside our homes. The trees were adorned with paper roses, candles, nuts, and fruits, which was groundbreaking! The idea of decorating a tree indoors took off and spread across Germany.
In the 1800s, German immigrants brought the tradition to America, who made their own interpretations. Early ornaments were made out of whatever items that families had on hand – fruit, nuts, strings of popcorn and cranberries, paper streamers, candles, and metal foil. The new idea of adding decorations to a tree really got peoples creative juices flowing! Eventually in the 19th century the craft of hand blown ball ornaments were introduce and once again added a whole new level of tree decorating.
Common Ornaments and Their Meanings
The Christmas Star: When Christ was born there was a great and shiny star in the sky and the star that we use to decorate our trees today is representative of the original Star of Bethlehem, Candy Canes: Are shaped like Shepherds crooks and Around 1900, the red stripes and peppermint flavoring were added. Christians believe that the red stripes represent the blood that Jesus shed on the cross and the peppermint flavoring represents the hyssop plant that was used for Biblical purification, Angels: Of course are to watch over us and keep our family and homes safe, but it also represents the angel that appeared in Bethlehem to announce the birth of Jesus, the angel Gabriel who told Mary she would give birth to Jesus. Now, Christmas tree ornaments have come to really represent the interests of each individual family and carry our own significant meanings.


Merry and Bright!
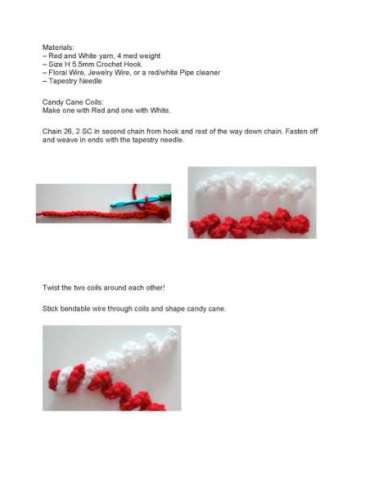
If you love the look of hand made ornaments or want to start your own traditions I have come across a 'sweet' pattern for crocheted candy canes. Below is a picture of what they look like and a downloadable pattern just for you. Merry Christmas & warm holiday wishes!


comments

Be the first to add a comment!

add comment